網頁前端自動化工具 – Grunt
今天為各位介紹的是一個前端工程師所使用的自動化工具「Grunt」,為何我們要使用這個工具呢?其實使用這個工具的原因有很多,因為他的擴充模組(Plugin)也很多,不過今天馬老師從自動最小化(Minify)的角度來介紹這個工具該如何使用。
一般來說前端網頁開發不外乎HTML、CSS、Javascript這三種語法,而在開發完成之後,為了要節省流量,我們可能會把這三個檔案壓縮後再上傳到網站伺服器上,何謂壓縮請參考下圖:
從上面的檔案可以觀察出在開發時我們為了閱讀的便利,常常會利用註解、空白…等來輔助,但真正發佈出去這些東西卻不是必要的,甚至在開發的時候我們為了方面會把CSS或JS拆成好幾個檔案,但發佈之後卻希望可以合併,但如果需要人工來做這件事,可想而知會有多麻煩,這個時候Grunt就會發揮效用了,設定好之後只要一個指令,他就可以幫我們做好這些動作,接下來就來看看該如何使用吧。
首先Grunt是一個基於node.js下的應用程序,所以必須先安裝node.js,安裝的部分並不難,從官網下載後直接執行安裝即可。
接下來可以參考Grunt網站中Getting Started的單元,或是跟著以下(以Windows為案例)的方式進行Grunt的安裝。
- 打開「命令提示字元」。
- 輸入「npm install -g grunt-cli」。
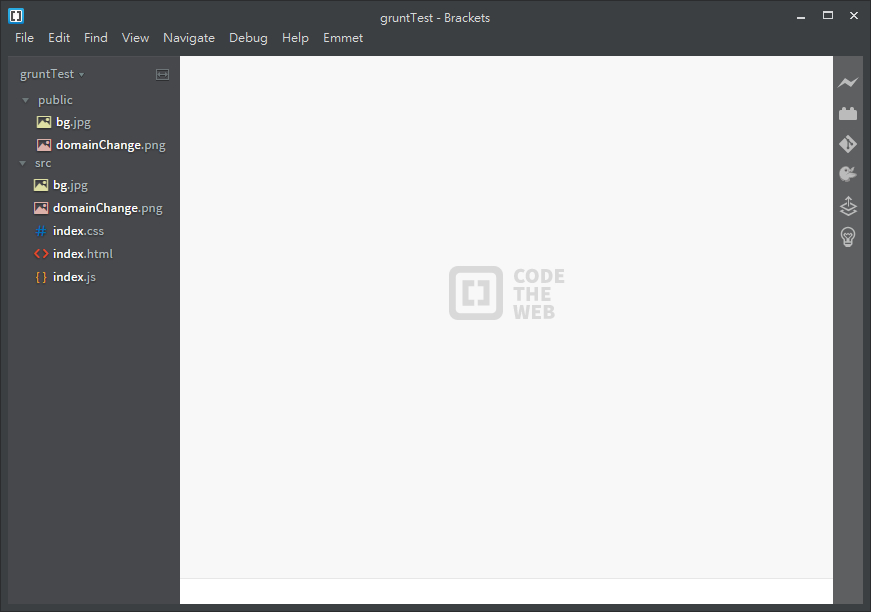
- 接下來就可以準備網頁專案資料夾了,如下圖所示,我的網頁專案資料夾簡單分成兩個:
- src:所有開發檔案
- public:發佈至網路上的檔案
- 這樣準備的目的應該很清楚,就是希望在src資料夾內以自己最習慣、最方便閱讀的方式來開發,而開發完畢之後可以把壓縮的檔案轉至public資料夾,上傳到伺服器上。
有關於網頁內容開發的部分,本篇文章就省略,所以可以看到上面圖檔中我已經準備好了HTML、CSS、JS各一個,直接進入利用Grunt開始做自動最小化的部分。
- 使用Grunt時,必須在網站根目錄建立兩個檔案:
- package.json:Grunt的專案設定檔,其中可以包含專案名稱、作者、版本,所需要使用的Plugin…等,可以參考下面我的檔案。
- Grunt.js:Grunt的執行腳本,以本案例來說就是要去哪個資料夾,壓縮哪些檔案後存放在哪邊,需在本檔案中指定。
{
    "name": "gruntTest",
    "version": "0.1.0",
    "author": "Stanley Ma",
    "devDependencies": {
        "grunt": "~0.4.5",
        "grunt-contrib-htmlmin": "~0.4.0",
        "grunt-contrib-cssmin": "~0.13.0",
        "grunt-contrib-uglify": "~0.9.2"
    }
}
以上面的package.json檔案來說,定義了專案名稱、作者、版本以及所需要使用的Grunt版本(撰文時Grunt穩定版為0.4.5)和Plugin列表,因為開頭有提到,本案例以最小化的角度來介紹Grunt,所以用到的三個Plugin分別為:
- grunt-contrib-htmlmin:最小化HTML檔。
- grunt-contrib-cssmin:最小化CSS檔。
- grunt-contrib-uglify:最小化JS檔。
- 接下來利用Grunt的專案設定檔來安裝所需要的Grunt和各個外掛,利用「命令提示字元」進入網頁專案的根目錄,輸入「npm install」,他就會在專案資料夾中安裝好所有需要的Plugin。
- 接下來就要開始準備撰寫Grunt.js的執行腳本,大家可以參考我的專案檔案寫法:
module.exports = function (grunt) {

    grunt.initConfig({
        htmlmin: {
            Target: {
                options: {
                    removeComments: true,
                    collapseWhitespace: true,
                    removeEmptyAttributes: true,
                },
                files: {
                    'public/index.html': 'src/index.html',

                }
            }
        },

        cssmin: {
            target: {
                files: {
                    'public/index.css': 'src/index.css'
                }
            }
        },

        uglify: {
            target: {
                files: {
                    'public/index.js': 'src/index.js'
                }
            }
        }

    });

    grunt.loadNpmTasks('grunt-contrib-htmlmin');
    grunt.loadNpmTasks('grunt-contrib-cssmin');
    grunt.loadNpmTasks('grunt-contrib-uglify');

    grunt.registerTask('default', ['htmlmin', 'cssmin', 'uglify']);

};
這樣的寫法會讓Grunt把在src裡面的三個檔案,分別壓縮後複製一份到public的資料夾中,確定資料夾和檔案無誤之後,繼續下一步動作。
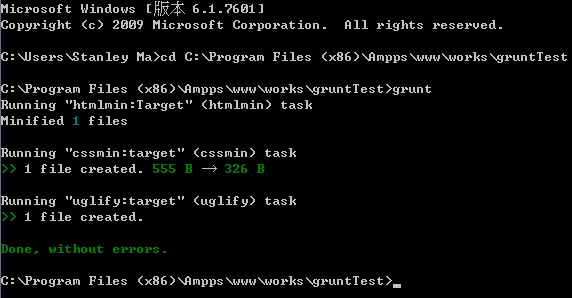
- 利用「命令提示字元」進入網頁專案的根目錄,輸入「grunt」之後,出現以下的畫面表示成功。
- 本案例利用三個Grunt的Plugin完成,分別是:「grunt-contrib-htmlmin」、「grunt-contrib-cssmin」、「grunt-contrib-uglify」,其實這三個外掛都有一些其他的參數,另外也可以進行多檔案的批次轉換以及檔案合併…等等功能,建議有需要的同學可以到Plugin各自的網站上去看看使用方式。
附帶一提,一開始就有提到關於Grunt自動化的Plugin非常多,本文僅用到了三個,這裡有Plugin的列表,對這方面有興趣的同學們也歡迎到網站上看更多相關的自動化功能。







online pharmacy viagra india
retin a 01 cream
nolvadex during cycle does tamoxifen cause bone loss
what does female viagra do when is the best time to take viagra
best home theatre power manager
Great write-up, I am a big believer in placing comments on sites to inform the blog writers know that they’ve added something advantageous to the world wide web!
I don’t know if it’s just me or if everybody else experiencing issues with your site. It appears as though some of the written text on your content are running off the screen. Can someone else please provide feedback and let me know if this is happening to them as well? This could be a problem with my web browser because I’ve had this happen before. Appreciate it
viagra pills 100 mg
viagra price pfizer
prednisone 10mg online
canadian online pharmacy viagra
american pharmacy
cheapest price for amoxicillin 500mg
zoloft rx online
1st avenue chat gay
gay chat cam
local gay chat room
generic for atarax
sildenafil 120 mg
generic viagra online pharmacy usa
Hi fellow mommies-to-be. clomid for males
trusted online pharmacy
doxycycline generic buy doxycycline 100mg buy stromectol online uk
furosemide brand name
mulnupiravir molnupiravir antiviral
https://viagracanada.xyz/# is viagra government funded
https://molnupiravir.life/# cost of molnupiravir
online pharmacy viagra india
where to buy propecia in us
lexapro online cheap
https://viagracanada.xyz/# over the counter viagra substitute walmart
buy clomid in uk It will likely take longer for it to happen and come with a bit more effort but it can certainly happen.